How to Install Drawer Slides in 90 Seconds
Hey guys this is mike Dugan your hardware guru! I'm no mind reader but I can still guess what you're thinking! 90 seconds?... start to finish?... yeah right!! Hey, normally in a video like this, they string you along and the money shot only comes in the end. But you showed the faith, you clicked, you're here. So let me return the favor by skipping the kale salad and diving straight into dessert with a quick demo. Don't worry I'll cover all the details later. You know... after you hit the like button.
So, if installing drawer slides gives you agita, let me introduce you to your new best friend. The Dugan Drawer Slide Jig works on framed and frameless cabinets, helping you to quickly and easily install soft close, standard close, and push-to-open drawer slides. This thing checks every conceivable box. Other jigs cost far more and work with just the cabinet member. Uh... what's the point in that? That's only half the job! The Dugan Drawer Slide Jig pre-drills for cabinet and drawer box members with dead nuts accuracy, because here's a dirty little secret about installing drawer slides... of the eight points of contact that need to be in alignment, you've only got to be off on one of them for the whole shootin match to go sideways. Oh, and good luck figuring out where the mistake is before the frustration makes you want to set your hair on fire!
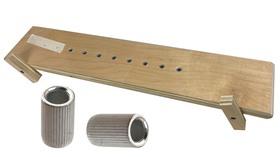
Okay, let's back up a bit so we can focus in on some details. the jig is made from1/2" MDF and comes with four indexing pins. the bottom two you'll need just for the drawer box, but the front two pins can go in permanently. They fit pretty snugly, but if they do loosen over time, you can keep them in place with a bit of tape.
You'll need a 9/32" drill bit which should go all the way into the chuck so it sticks through the jig just 3/8". To avoid having a million confusing holes, we made a different jig for every slide length, so if you order 20" drawer slides you'll want a 20" jig. The outside two holes are for the cabinet members and the inside holes are for the drawer members.
The jigs are made to work with the whole pattern on Desunia slides but it is easy to adapt them to other brand slides which we'll get to in a minute. Let's do the cabinet members first. Hold the jig with the index pins against the cabinet face and rest it on the stretcher. Drill the holes, and attach the slides. Now repeat for the other side, which is super easy since the jig is symmetrical.
The drawer box is just as straightforward. Put the bottom two index pins in, position the jig, drill the holes, attach the slide. Again, because the jig is symmetrical you just flip it over for the other side. The result? All four members in perfect alignment, and a drawer that feels like it's floating on air with zero fuss. Notice that the jig locates the drawer an ideal 1/4" above the stretcher and keeps the slides low so they're more out of sight.
For face frame cabinets, start by using the jig just to drill the front hole. The trick now is to transfer the height of that front hole to the back of the cabinet. I could do this with a tape measure, but I find it's easier to use a combination square like I'm doing here. If you have more than one drawer to do at this height, consider making a story stick out of scrap to really speed things along.
Well, that gives us the height of the rear bracket, but what about its side location? I'll just hold the rear bracket against the face frame and then take a ballpark measurement from the cabinet carcass to the middle of the slot. Looks like about 1 1/16" in this case. So, all I have to do is transfer that measurement to the back of the cabinet, and drill a hole at the crosshairs.
Now install the slide. If the drawer is a little heavy, consider getting a longer screw for the front. When you attach the rear bracket, just make it hand tight so you can still adjust it side to side, Once you've got it all dialed in, add a couple of more screws to lock it all in place, Keep in mind that the rear bracket will give you a maximum extension of 2", so if you need more than that (say you have a 20" drawer and a cabinet depth of 23") you'll need to screw some wood blocking to the back of the cabinet first.
Now, what about tall drawers like garbage pullouts? Well, these drawers are top-heavy so the slides really should be mounted more toward the top. The best way is to cut a spacer out of some scrap to locate the jig as you drill for the cabinet members. For the pullout itself, chop 1/2" off the spacer flush it up to the bottom. Position the jig, and drill. This will put the bottom of the pullout 1/4" above the floor of the cabinet. If you want the pullout to wind up higher, just take that much more off the spacer, If you don't feel like using a spacer, a tape measure and pencil will still get you there, but the spacer method is a lot easier. Trust me on that.
Well, I promised to show you how to adapt the jig to other brands of slides but before I do I really need to point out that aside from using thicker steel and a more robust soft-close mechanism, Desunia also uses 50% more ball bearings than the competition, so i mean c'mon! But if you insist on using brand X we're not going to hold it against you!
Start by taking a nice sharp pencil and connect the two dots between the two sets of holes. Strike another line like so, to represent the face of the cabinet. For the cabinet member, all brands are going to have this same hole in the front, so temporarily screw the slide itself right onto the jig through that hole. Now pivot the slide so it's centered on your pencil line and drill through one of the back holes. If you have a self-centering vix bit, use that to start the hole. and then finish with the 9/32" bit. For the drawer member, lay the slide on top of the jig so it's even with this line and centered on this one. Notice how in this case, I'm pretty much in no man's land and can't use the original hole that came with the jig. That's okay, I'll just jump over here and use this hole instead, drilling and temporarily screwing the drawer member right onto the jig, just like i did with the cabinet member a moment ago. Then I'll do the same thing for the back, lining up the pencil mark and drilling through, By the way, if after attaching the front of the slide to the jig you realize that you were a little bit off on the pencil mark, that's okay. Just duplicate the error by the same amount when you do the back. The important thing is to keep the holes parallel, that's the key. Finally, cover any unneeded holes with some tape and you're good to go.
Final tip... if you're sure you've done everything right, but the drawer still feels a bit sticky, you could have a warped drawer on your hands. Because remember, being off on just one point of contact is all it takes to go from slide nirvana to Defcon 1. Here's the hack. Remove the front screw from one of the drawer members and put it into the vertical oblong hole instead. Keep it just hand-tight and then with the drawer nearly closed, tighten it when the drawer reaches its own equilibrium.